How To Adjust Treadmill Belt: Quick Step-By-Step Fix
Tighten the rear adjustment bolts a little, center the deck, test, then repeat until the belt tracks smoothly.
I’ve adjusted dozens of belts on home and gym treadmills, so I know what works and what can go wrong. This guide on how to adjust treadmill belt walks you through safe steps, tools, troubleshooting, and maintenance. Read on for clear, tested advice you can use right away to keep your treadmill smooth, quiet, and safe.
Why you should know how to adjust treadmill belt
A properly adjusted belt keeps your run safe and protects the motor and deck. When you know how to adjust treadmill belt, you avoid uneven wear, noisy workouts, and sudden slips. This saves money and keeps your exercise routine steady.
Adjusting the belt can extend the treadmill’s life by preventing damage to the rollers and motor. Small, regular tweaks are easier than major repairs later. Learning this skill means fewer service calls and more reliable workouts.

Signs your treadmill belt needs adjustment
Watch for these clear signs that it’s time to learn how to adjust treadmill belt:
- Belt drifting to one side or rubbing the side rails frequently.
- Slipping under load, especially when you increase speed or incline.
- Loud squeaks, thumping sounds, or chattering while walking.
- Uneven wear on the belt edges or frayed material.
If you see any of these, stop using the treadmill until you inspect and adjust the belt. Ignoring signs can damage the deck and motor quickly.

Tools and safety checklist before you adjust treadmill belt
Before you start, gather simple tools and follow safety steps:
- 6mm or 5mm hex key or Allen wrench, depending on the model.
- Open-end wrench or socket set for some brands.
- Manufacturer manual or sticker for torque and part details.
- Lint-free rag and treadmill lubricant if needed.
- Safety tip: unplug the treadmill and set the emergency key aside.
Always let the machine cool down if it just ran. Wear snug clothes and keep fingers clear of rollers while testing. These steps make how to adjust treadmill belt safe and simple.

Step-by-step: how to adjust treadmill belt
Follow this clear, repeatable process to adjust most home treadmill belts.
- Power off and unplug the treadmill.
- Move the belt by hand to inspect for damage or foreign objects.
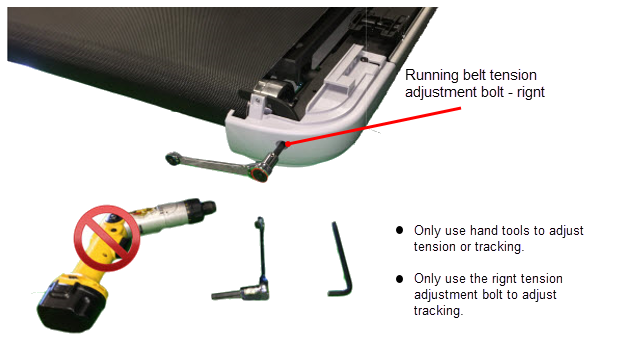
- Locate the rear adjustment bolts on the frame behind the belt.
- Center the belt visually with the deck. Note which side needs tightening.
- To tighten: turn both rear bolts clockwise a quarter-turn at a time. To loosen: turn counterclockwise.
- Plug the treadmill in, set speed to 2–3 mph, and watch belt tracking. Do not step on the belt yet.
- If the belt drifts, adjust the side it drifts toward by tightening that rear bolt slightly and retesting.
- When tracking is centered, test at a slow walk while standing on the sides. Finally, test with light walking.
- If the belt slips under load, slightly increase tension evenly on both bolts until slippage stops.
- Recheck after a 10–15 minute run and retighten if needed.
Repeat small adjustments and tests. Small moves protect the rollers and motor and reduce mistakes when learning how to adjust treadmill belt.

How to center and track the belt properly
Centering is key to long belt life. Use this simple method:
- Start with equal turns on both rear bolts so the belt sits near center.
- If belt shifts right, tighten the right bolt a quarter-turn; if it shifts left, tighten left.
- Always make symmetrical adjustments if the belt is loose overall.
If your treadmill has front-mounted adjustment bolts, follow the manual for that model. Front adjustments often require loosening rear bolts first. Proper centering is a major part of how to adjust treadmill belt correctly.
Checking belt tension and when to tighten
Tension affects grip and motor load. Check tension this way:
- Lift the belt at the midpoint. Good tension allows 2–3 inches of lift from the deck.
- If the lift is more than 3 inches, tighten both rear bolts evenly in small increments.
- If the belt is too tight, loosen slightly; overly tight belts strain bearings and motor.
After any tension change, re-test walking at low speed. Correct tension is essential to knowing how to adjust treadmill belt without causing harm.

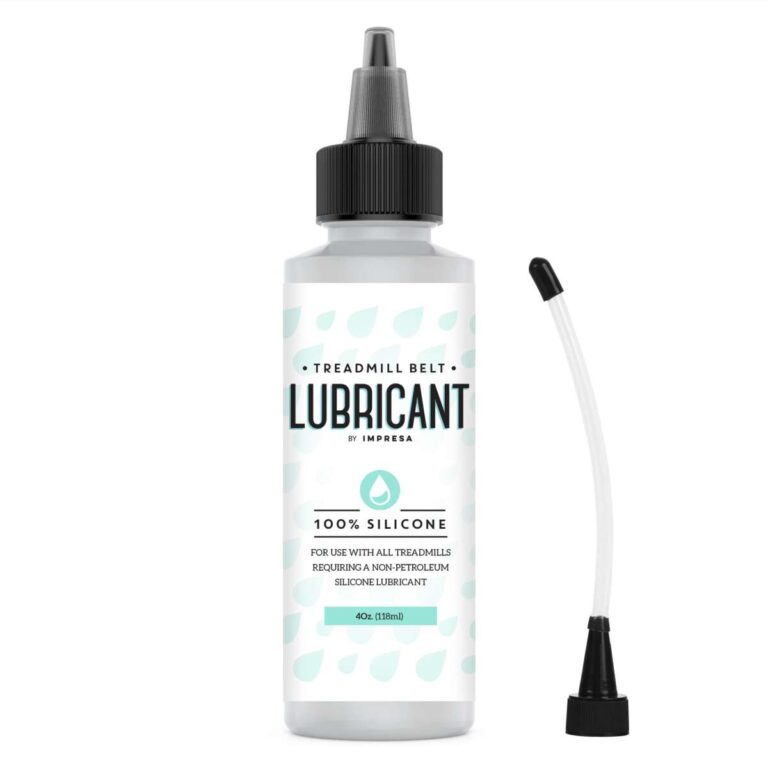
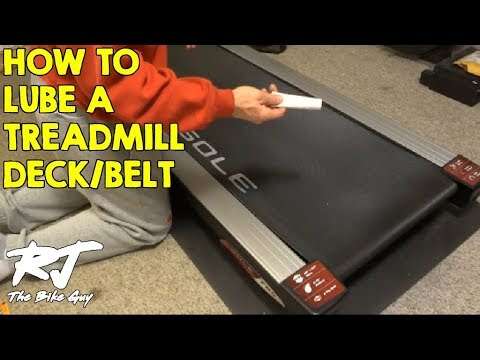
Lubrication and maintenance to keep adjustments lasting
Lubrication helps the belt glide and reduces the need for frequent adjustments. Follow these tips:
- Use treadmill-grade silicone lube recommended by the manufacturer.
- Apply lube under the belt at the center and run the belt slowly to spread it.
- Clean dust and lint from under the belt during maintenance.
Regular lubrication and cleaning make your adjustments stable and extend the life of the deck and motor. This maintenance is central to future success when you learn how to adjust treadmill belt.
Common problems and troubleshooting
Here are common problems and quick fixes related to how to adjust treadmill belt.
Problem: Belt keeps drifting after several adjustments.
- Fix: Check roller alignment and wear. Clean rollers and inspect for bent hardware. If issues persist, a service tech may be needed.
Problem: Belt slips under load even when tight.
- Fix: Clean belt and deck contact area. Add proper lube and check motor roller for worn surface or buildup.
Problem: Belt too noisy after adjustment.
- Fix: Verify tension isn’t too tight. Tight belts make bearing noise. Loosen slightly and re-test.
Problem: Adjustment bolts won’t turn or are stripped.
- Fix: Stop and call a pro. Forcing stripped bolts can worsen damage. Replacement parts may be needed.
Common quick questions (PAA-style)
What if the belt moves only while I run fast?
- Small slippage at higher speeds often means the belt needs a slight tension increase and a check for worn rollers.
Can I use household oil instead of treadmill lube?
- No. Household oils attract dust and can damage the belt. Use manufacturer-approved silicone lube.
How long after adjustment should I recheck the belt?
- Recheck after 10–15 minutes of normal running and again after a week of use to confirm stability.
Personal experience: tips, mistakes to avoid, and lessons learned
I’ve adjusted many home and gym belts. Here’s what I learned:
- Make tiny turns. A quarter-turn at a time prevents over-tightening.
- Always test at low speed first. I once overtightened a belt and stressed the motor; small moves avoid that error.
- Keep a log of adjustments and dates. It helps spot patterns and decide when to replace the belt.
Mistakes to avoid:
- Don’t use generic oils. They harm the belt and deck.
- Don’t ignore unusual wear patterns. They often point to deeper issues that simple adjustments won’t fix.
- Don’t rush. Rushed adjustments can bend rollers or strip bolts.
These lessons make how to adjust treadmill belt safer and more effective.
Maintenance schedule and best practices
A simple routine keeps the belt in top shape:
- Weekly: Wipe the belt and vacuum around the deck.
- Monthly: Inspect belt alignment, tension, and rollers.
- Every 3–6 months: Apply silicone lubricant as recommended and check motor area for dust.
- Annually: Have a professional service check bearings, rollers, and motor if you use the treadmill heavily.
Consistent care reduces the number of times you need to adjust the belt and saves money in the long run.
Frequently Asked Questions of how to adjust treadmill belt
How tight should a treadmill belt be?
A belt should allow about 2–3 inches of lift at the center. Too tight strains bearings and motor; too loose causes slipping.
How often do I need to adjust my treadmill belt?
Most home users adjust the belt every few months or when they notice drifting or slipping. Heavy daily use may require monthly checks.
Can I adjust my treadmill belt myself, or do I need a technician?
You can adjust most home treadmill belts safely with basic tools and care. Call a technician for stripped bolts, worn rollers, or persistent issues.
Is lubrication necessary when adjusting the belt?
Yes. Proper lubricant reduces friction and keeps adjustments stable. Use manufacturer-recommended silicone lube only.
What causes a treadmill belt to move to one side?
Common causes include uneven tension, worn rollers, debris buildup, or a bent frame. Small adjustments can fix tracking, but deeper issues need inspection.
My belt still slips after tightening. What now?
Check for dirt under the belt, worn roller surfaces, or a failing motor. Clean and lubricate first, then test; if it still slips, seek professional help.
Conclusion
Learning how to adjust treadmill belt is a practical skill that keeps your workouts safe and your treadmill running longer. Use small, steady adjustments, test carefully, and include regular lubrication and inspection. Start with the simple steps here, keep a maintenance log, and don’t hesitate to call a pro for mechanical problems.
Take action today: inspect your treadmill, tighten or center the belt as needed, and schedule routine maintenance. If you found this guide helpful, consider subscribing or leaving a comment about your treadmill model and problems so others can learn from your experience.

Brandon Knoxley is a sport & fitness writer and training guide contributor at MySportFitHub. He focuses on practical workouts, performance-based training, and honest fitness gear insights designed for real people and real results. Brandon is passionate about helping beginners and active individuals train smarter, avoid common mistakes, and build sustainable fitness habits.